I really love my Suzuki Jimny. It’s a top of the range 2015 Jimny Sierra Land Venture (JB43W), a tiny but seriously capable Japanese 4x4, and there are few things I love more than this car.
I’ve been on a journey to upgrade the sound system. I started with a new head unit, the Kenwood, and then upgraded the front speakers in the footwells. Even though they were quite decent speakers, I just couldn’t get good sound coming through, with them hidden down in the footwells and all. So I’ve kept going, upgrading the system to a level I’m satisfied with, and this post outlines that journey.
Contents
The system
Up front it’s an active front stage, with Morel carbon-fibre midbass in the kick panels and Audison Voce tweeters on the dash. There are Focals in the back and an active sub under each front seat. Every one of them gets its own amp channel, all run from one Match DSP amp hidden in the glovebox. The DSP takes its signal from the Kenwood’s speaker outputs and lets me tune every speaker individually, so it all comes together as one proper system.
The speakers are tiny, just 10cm, but with the tweeters and subs filling in the top and bottom, and the DSP amp powering the lot, it’s a really great system.
| Part | What it does |
|---|---|
| Kenwood DMX8021DABS | Head unit |
| Match UP 6DSP MK2 | 6-channel amp with a 7-channel DSP. 130 × 130 × 46mm, so it fits in the glovebox |
| Morel Virtus Nano MW4 | 4” midbass in the footwell kick panels |
| Audison Voce II AV 1.1 II | Tweeters on the dash |
| Focal ICU 100 | 4” coaxials in the rear |
| 2 × Harman Kardon Feel 700 | Active underseat subs, 125W RMS each, daisy-chained |
| Audiotec Fischer URC.1 | Remote knob for sub level |
Why the Match: it’s a good DSP (digital sound processor), and it lets each speaker have its own crossover, level, delay and EQ. It’s Class D, so it doesn’t get very hot, and it’s small enough to fit in the glovebox. The Kenwood head unit wasn’t sufficient for powering the speakers.
An “active front stage” means each front tweeter and midbass (the 4” speaker that handles vocals and punch) gets its own amp channel, and the DSP decides which frequencies each one plays. Doing it in the DSP means I can tune each speaker for where it sits in the car.
flowchart TD
    HU["Kenwood head unit<br/>front L/R speaker outputs"] --> AMP["Match UP 6DSP MK2<br/>in the glovebox"]
    AMP -->|"A/B"| TW["Dash tweeters"]
    AMP -->|"C/D"| MID["Kick panel midbass"]
    AMP -->|"E/F"| REAR["Rear speakers<br/>factory wiring"]
    AMP -->|"Line out"| SUB1["Feel 700 #1"]
    SUB1 -->|"daisy chain"| SUB2["Feel 700 #2"]
Power
At full volume the amp can draw 35A and the two subs 28A between them, so 63A in total.
- 4AWG cable (about 21mm²) from the battery positive to an 80A fuse, within 300mm of the battery.
- Through the firewall to a 4-way fuse distribution block under the dash. I made a hole in the existing rubber grommet on the driver side and fed the cable through it.
- Two 8AWG (about 8mm²) fused branches from the block: 40A to the amp and 30A to the subs.
- The second sub takes its power from the first sub’s POWER OUT block, so one feed serves both.
I used 100% OFC (oxygen-free copper) cable throughout, not the cheaper CCA (copper-clad aluminium). It costs more, but CCA has higher resistance, so it would need to be thicker to carry the same current.
flowchart TD
    BAT["Battery +"] -->|"4AWG"| FUSE["80A main fuse<br/>within 300mm of battery"]
    FUSE -->|"4AWG, through firewall"| BLOCK["Fuse distribution block<br/>under the dash"]
    BLOCK -->|"40A fuse, 8AWG"| AMP["Match UP 6DSP MK2"]
    BLOCK -->|"30A fuse, 8AWG"| S1["Feel 700 #1"]
    S1 -->|"POWER OUT block<br/>+12V, ground, remote"| S2["Feel 700 #2"]
    AMP -->|"8AWG"| SPLICE["Crimped splice"]
    S1 -->|"8AWG"| SPLICE
    SPLICE -->|"8AWG"| GND["Seat bolt ground<br/>bare metal"]
    HU["Kenwood blue/white lead"] -->|"remote"| AMP
    AMP -->|"REM OUT"| S1
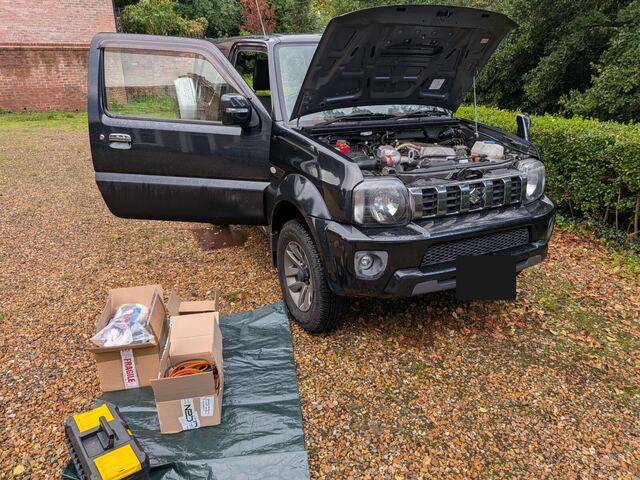 Day one: bonnet up, doors open, kit on the driveway.
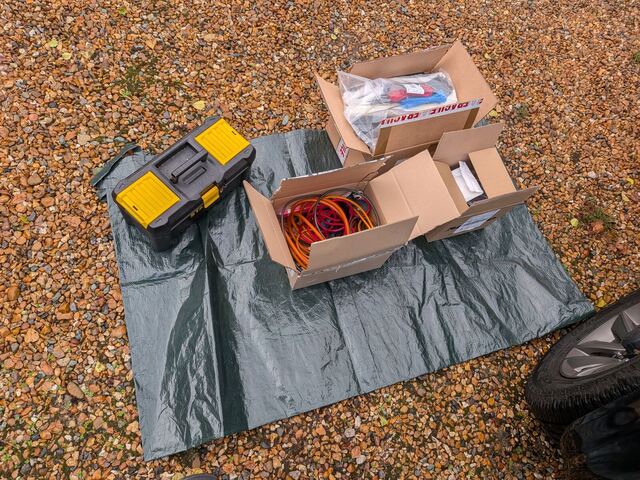 The kit, before starting.
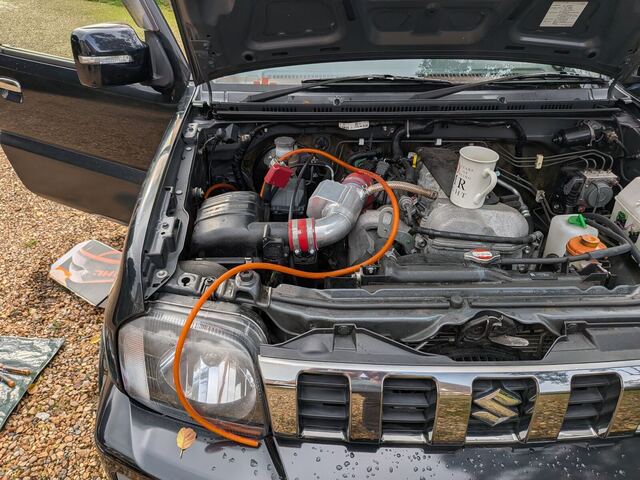 The 4AWG run from the battery, before routing and tidying.
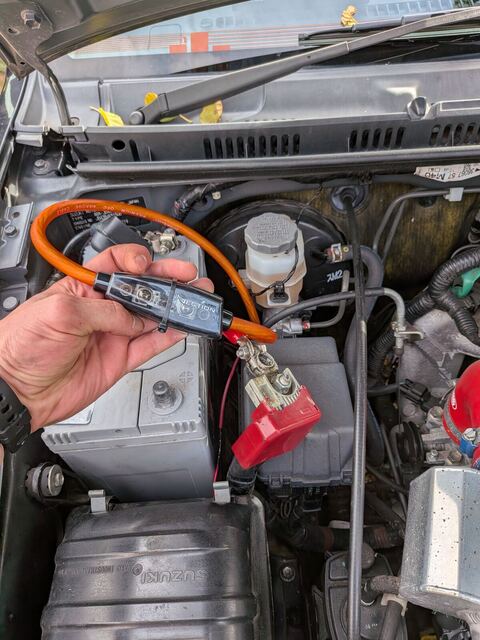 80A main fuse, close to the battery.
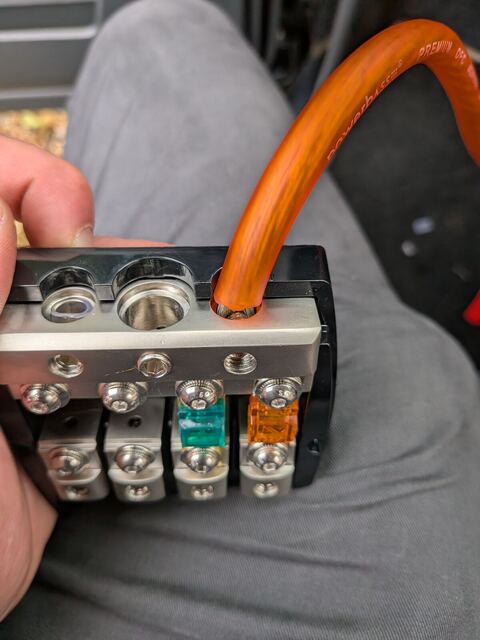 The distribution block with the amp and sub fuses.
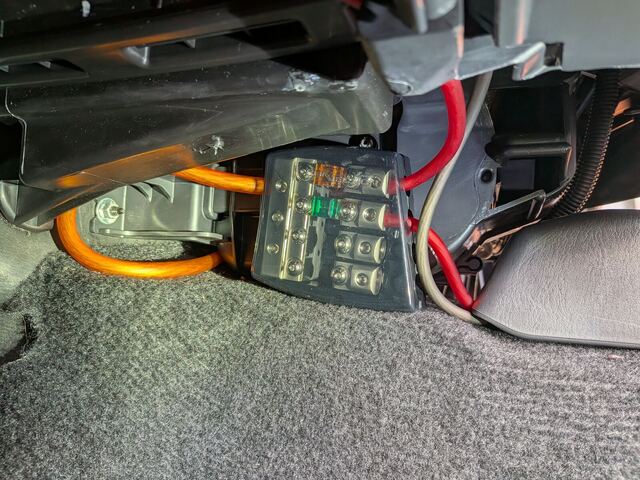 Fitted under the dash, where the fuses stay reachable. I didn’t really need such a big distribution
block, but it’s out of the way, so it’s fine.
Fitted under the dash, where the fuses stay reachable. I didn’t really need such a big distribution
block, but it’s out of the way, so it’s fine.
Ground
The amp and sub grounds join in one heavy crimped splice and go to the front bolt of the driver’s seat, sanded to bare metal on both faces. Using one ground point for everything stops alternator whine, and I haven’t had any.
I planned to upgrade the battery-to-body strap to 4AWG too, but on the JB43 the factory strap is very short and already sized for the starter motor, which pulls far more than 63A. So I left it.
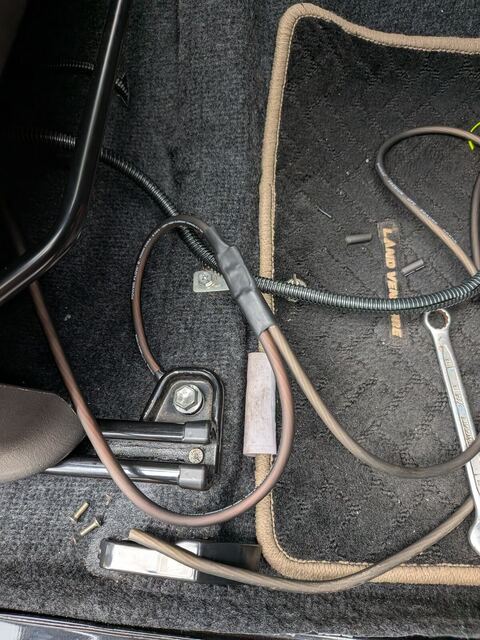 The ground at the seat bolt, with the amp and sub grounds joined in a single heat-shrunk splice.
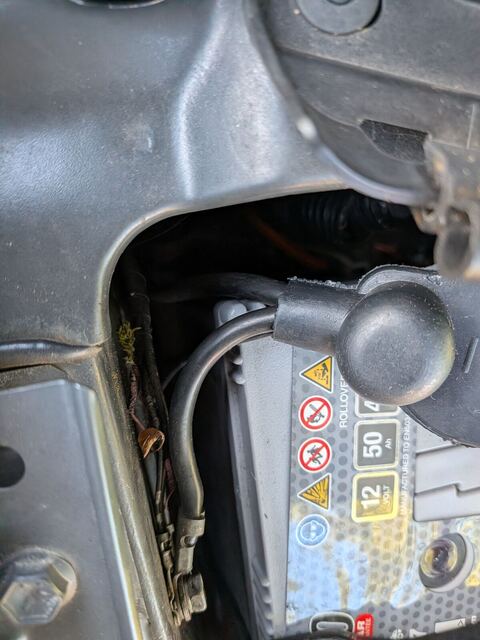 The factory battery-to-body strap is short enough to leave alone.
Remote turn-on switches the amp and subs on and off with the head unit. The Kenwood’s blue/white power-control lead goes to the amp’s REM IN, and the amp’s REM OUT switches the subs. There’s no splicing into the car’s wiring.
Signal
The Match amp doesn’t take RCA inputs. It’s designed to take high-level speaker inputs instead, straight from the head unit’s speaker wires, which suits a car like this.
The Kenwood’s wiring harness plugs into the car’s ISO connector. I cut only its 8 speaker wires, which left two loose ends:
- The Kenwood end goes to the amp’s inputs. Only front left and right are used, and the DSP makes every other channel from those two.
- The car end is fed from the amp’s midbass and rear outputs, so the factory wiring still carries the signal to those speakers.
The tweeters are the only speakers with new wire, since there’s no factory wiring to the dash.
flowchart LR
    HU["Kenwood"] -->|"front L/R<br/>harness, Kenwood end"| AMP["UP 6DSP MK2"]
    AMP -->|"A/B, new wire"| TW["Dash tweeters"]
    AMP -->|"C/D, harness car end"| MID["Kick panel midbass<br/>factory wiring"]
    AMP -->|"E/F, harness car end"| REAR["Rear speakers<br/>factory wiring"]
All the joins are crimped butt connectors. I didn’t cut anything on the car’s own loom, so fitting a new Kenwood harness would put it all back to standard.
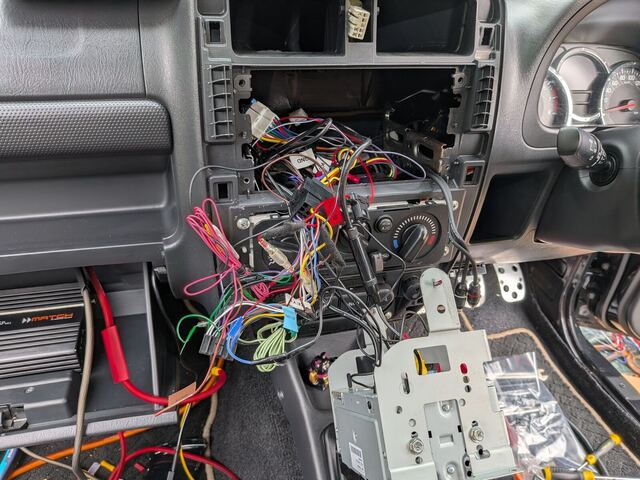 Head unit out. The speaker wires on the Kenwood’s harness got cut behind here. It’s an absolute
mess back there, I did my best to tidy up.
Head unit out. The speaker wires on the Kenwood’s harness got cut behind here. It’s an absolute
mess back there, I did my best to tidy up.
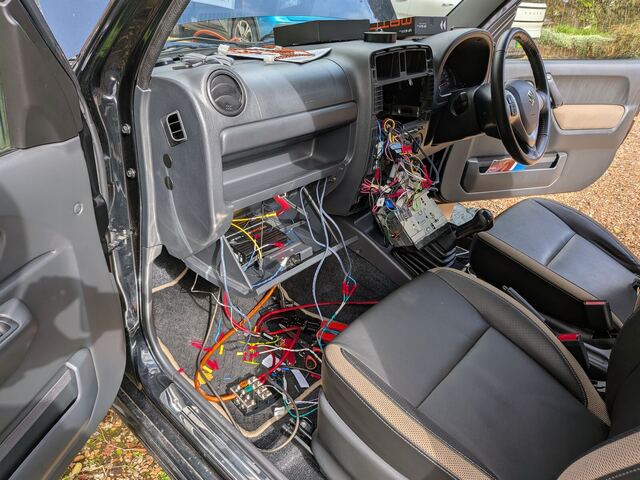 The dash stripped mid-install.
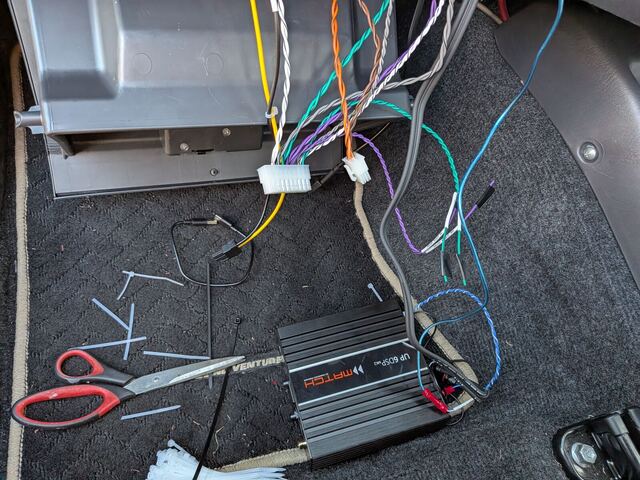 The amp’s plug-in harnesses, ready to be wired to the head unit harness.
The amp in the glovebox
I planned to mount the amp behind the glovebox, but the space back there was too awkward to work in. So it went inside the glovebox on heavy-duty velcro, with the cables fed through the existing gap at the back. Nothing was drilled, and I can still reach the USB port for tuning. The velcro keeps it mounted really well and provides a bit of padding.
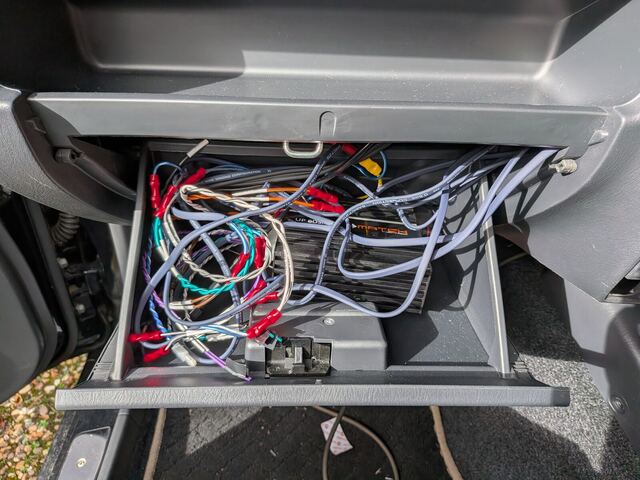 Before tidying: everything comes together in the glovebox.
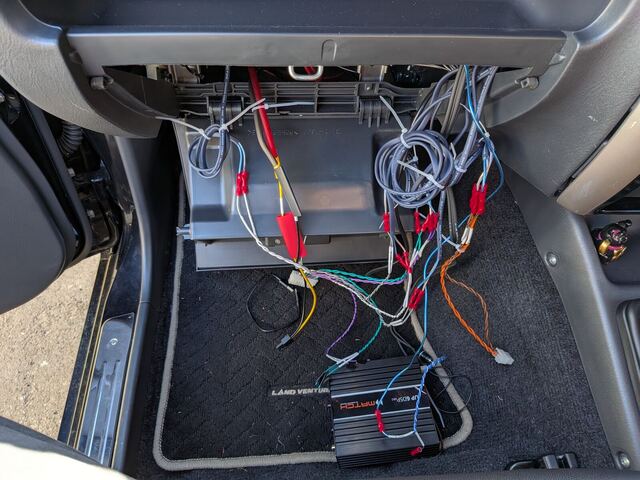 Mid-install. The amp’s harnesses come with bare wire ends, so nothing needs terminating at the amp.
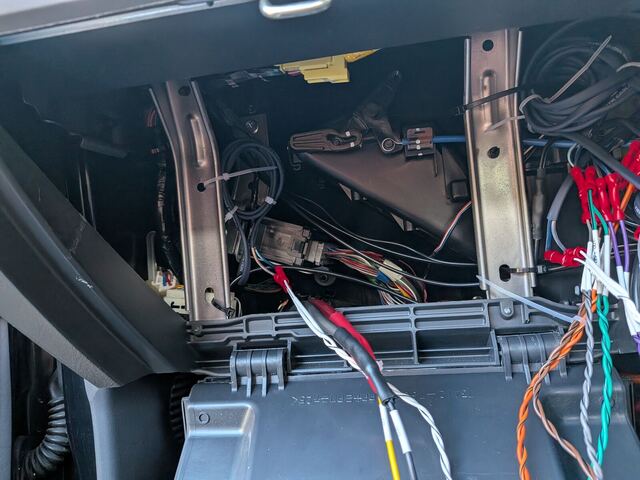 Behind the glovebox. The cables come through the gap at the back.
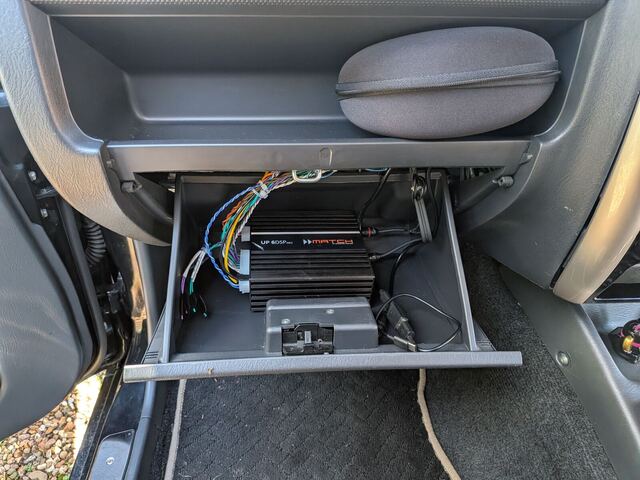 Mounted. The glovebox still opens and closes freely, but can’t be used for storage any more.
Two subs under the seats
The Feel 700 is 260 × 195 × 58mm and fits under both front seats. The second sub is chained from the first: power through the POWER OUT block, and signal through an RCA lead from the first sub’s output.
The supplied pigtails didn’t reach between the seats on their own, so I extended them with 27A cable (about 3mm²), red for +12V and black for ground, and ~1mm² hook-up wire for the blue remote lead. All the joins are crimped butt connectors.
The amp’s sub output is mono, with one RCA socket, but the Feel 700 needs a signal on both its left and right inputs. A cheap 1-female-to-2-male Y-adapter at the sub end sorts that out. Without it the sub plays quieter.
flowchart LR
    AMP["Amp line out<br/>mono RCA"] -->|"one RCA lead"| Y["Y-adapter<br/>1 female → 2 male"]
    Y -->|"L + R"| S1["Feel 700 #1"]
    S1 -->|"RCA out → RCA in"| S2["Feel 700 #2"]
    S1 -->|"POWER OUT pigtails<br/>joined red-red, black-black, blue-blue"| S2
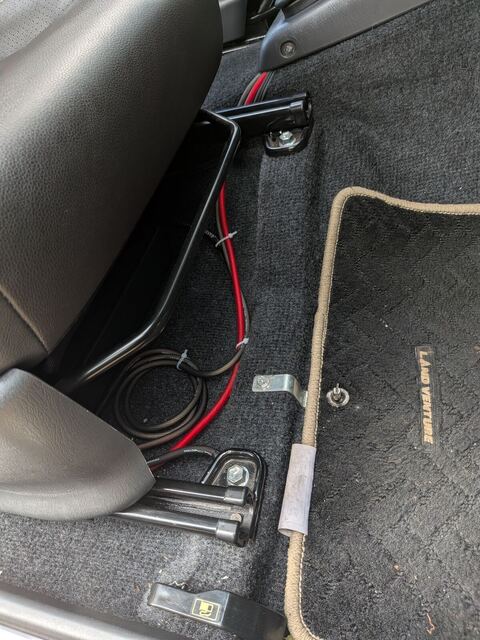 The main power run comes in under the driver’s seat, where the amp ground joins the sub ground. These runs will get a proper tidy-up.
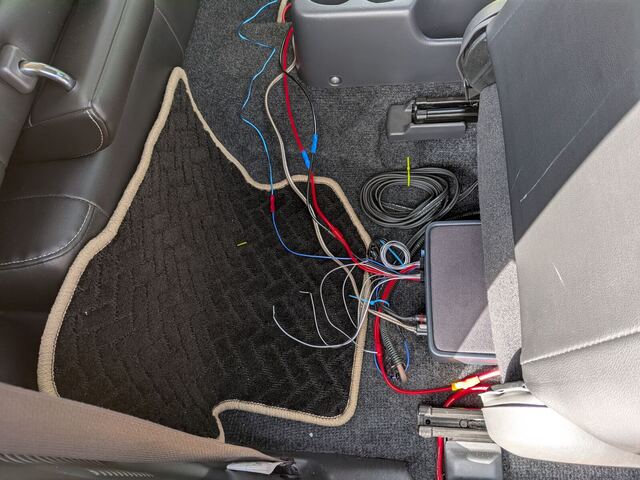 Wiring in progress. The seats stayed in.
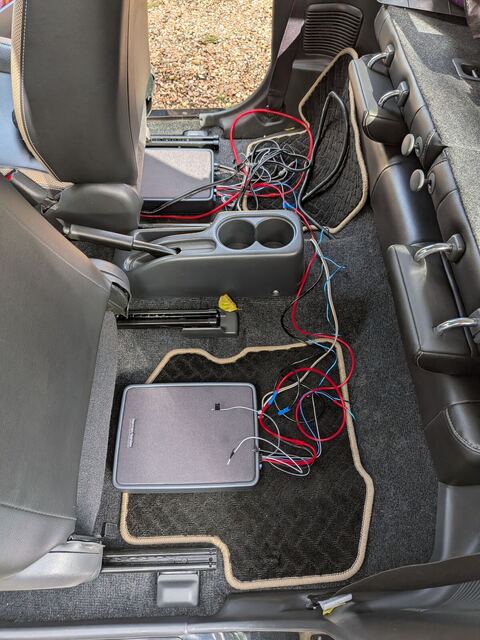 Subs connected. They’ll be turned 90° to save as much space as possible.
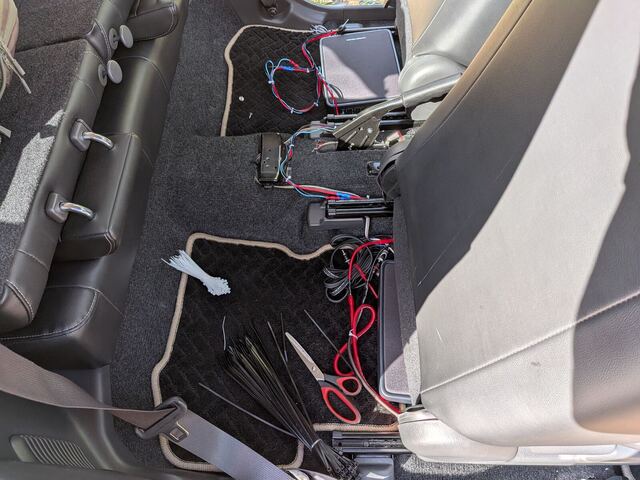 Starting to tidy the sub wiring, running it over the centre console.
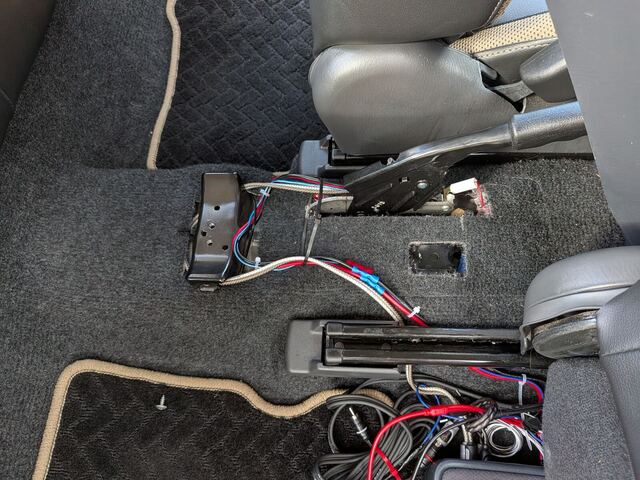 More work to make it neat over the centre console.
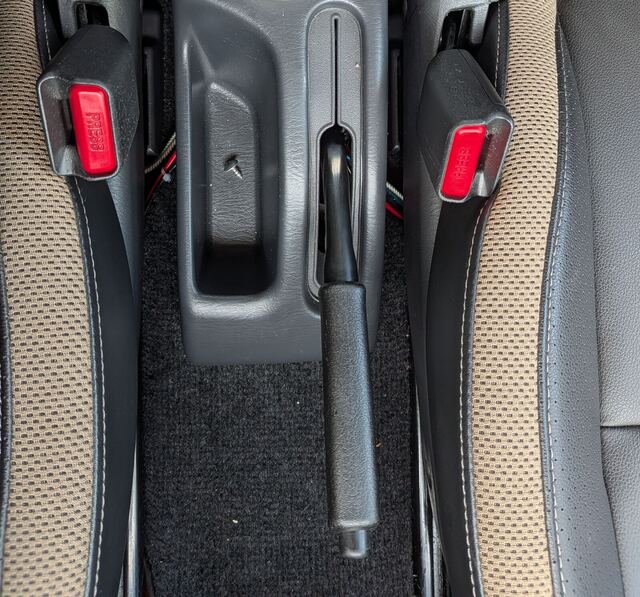 Mostly tidy. A few wires still show beside the console.
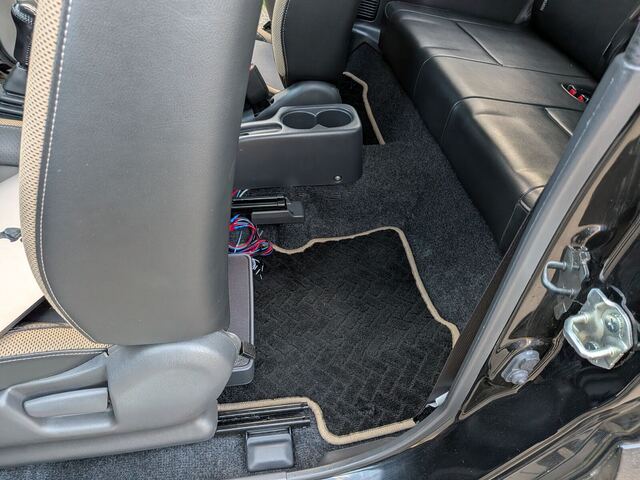 The finished sub, seen from the back seat with the front seat slid all the way forward. Rear
passengers can still get in and out without any trouble.
The finished sub, seen from the back seat with the front seat slid all the way forward. Rear
passengers can still get in and out without any trouble.
Speakers
Front speakers
The front speakers sit in the footwell side panels (the kick panels). Getting to them was simple:
- I undid the screws on the silver sill plate along the bottom of the door opening and lifted it off.
- The plastic trim underneath popped off.
- Then the kick panel popped off, exposing the speaker.
The front stage is Morel Virtus Nano MW4 midbass and Audison Voce II AV 1.1 II tweeters. The MW4 is from Morel’s high-end range, with a carbon-fibre cone and a neodymium magnet. The AV 1.1 II is a soft-dome tweeter that plays up to 40kHz.
- The MW4 is only 17mm deep, which suits the Jimny’s kick panels.
- The AV 1.1 II can cross lower than most tweeters (down to 1.8kHz), which lifts the vocals from the footwells up to the dash.
Fitting the MW4s was a big job. They come with small screws, and their mounting holes don’t line up with the Jimny’s existing speaker screw holes. I first made MDF spacer rings to bridge the two, but with the rings in, the kick panel wouldn’t fit back on, and I wasn’t willing to cut the panel to make it fit. So I drilled new holes in the bodywork instead, using a spacer ring as a template, as there’s very little room to work in the footwell.
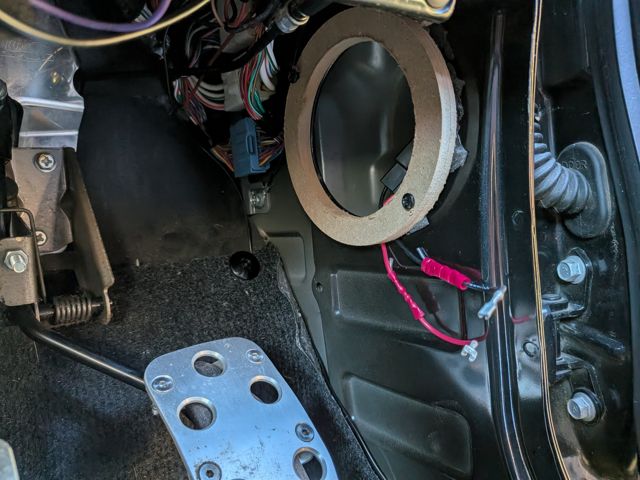 One of the MDF spacer rings, test-fitted on the driver side. With the ring in, the kick panel
wouldn’t fit back on.
One of the MDF spacer rings, test-fitted on the driver side. With the ring in, the kick panel
wouldn’t fit back on.
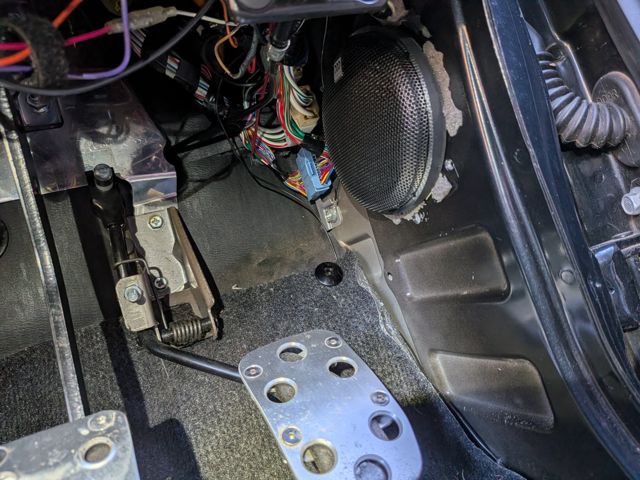 The MW4 in the driver-side kick panel, with the panel off.
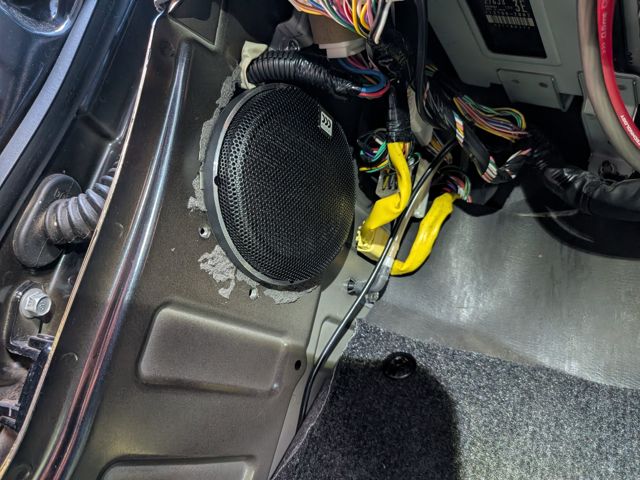 The passenger side. The grey patches around the speaker are leftover sticky foam from the old
speakers, which I couldn’t fully remove.
The passenger side. The grey patches around the speaker are leftover sticky foam from the old
speakers, which I couldn’t fully remove.
The Voce tweeters are really impressive. Honestly they’re probably far too much for my small little car. They’re quite big too, so they stand out on the dash. I’ve had to turn them down quite a lot in the DSP, but they’re amazing tweeters.
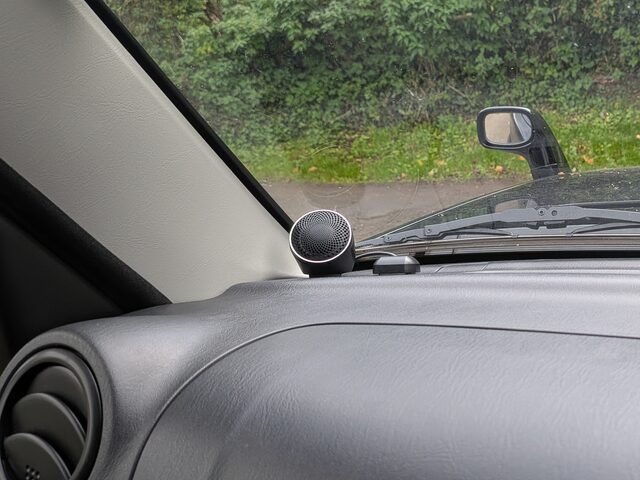 The passenger-side AV 1.1 II tweeter on the dash at the base of the A-pillar.
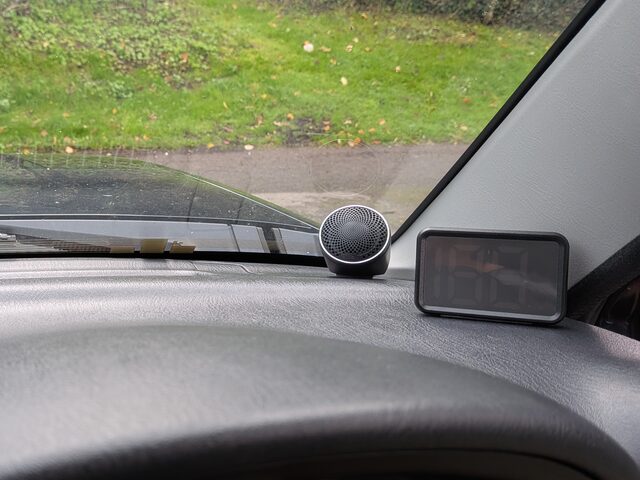 The driver-side tweeter in the same spot on the other side.
Mounting the tweeters was fairly straightforward, but I had to take the A-pillar trims off first, to make space to push the wires down the side of the dashboard and across to the amp. The trims pulled off from the top once I’d peeled back the door rubber.
Rear speakers
The rear Focal ICU 100s were fitted by a shop quite a while ago, since getting to them means taking the rear seats out. If I upgrade them in future, I’d be tempted to do it myself now I’ve got more experience. There’s a good step-by-step guide here: Installation of the rear speakers on the Suzuki Jimny.
Tuning
I set up the DSP in Audiotec Fischer’s DSP PC-Tool. It’s Windows only, so on my Mac I ran it in a virtual machine, using the free VMware Fusion. I set the Kenwood flat first, with EQ, loudness and crossovers all off.
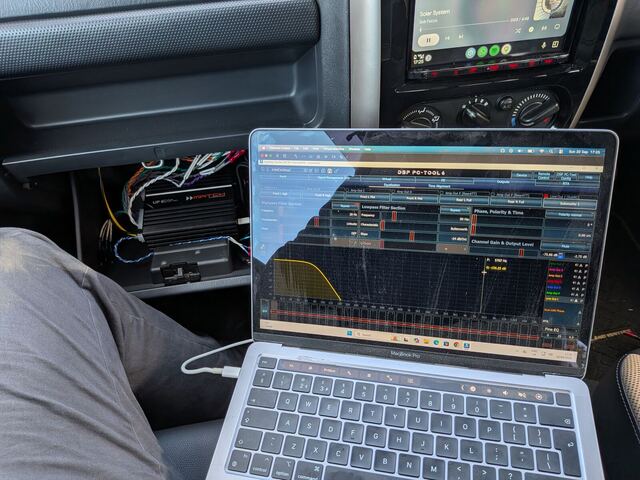 Tuning from the passenger seat, laptop plugged straight into the amp in the glovebox.
Input gain
This matches the amp to the head unit’s signal. With every output muted, so nothing actually plays, I put the Kenwood at about 90% volume and played Audiotec Fischer’s IGS test track. In PC-Tool’s Advanced Gain Setup I raised the input slider until the clip indicator turned red, then backed it off one step.
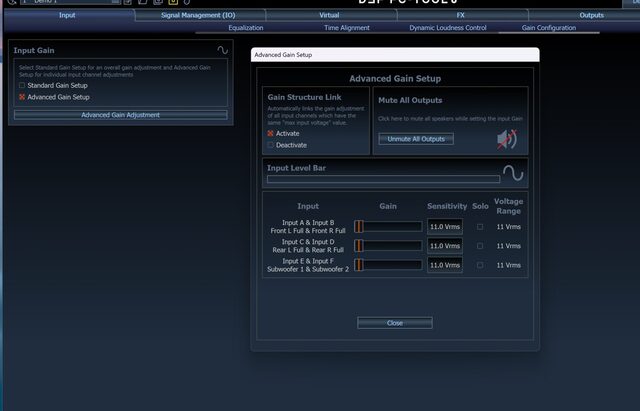 PC-Tool’s Advanced Gain Setup, with all outputs muted while the input gain is set.
Routing
Only the amp’s front left and right inputs are used. In PC-Tool’s routing, front left feeds the left tweeter, midbass and rear, front right feeds the right ones, and the sub gets an even mix of both.
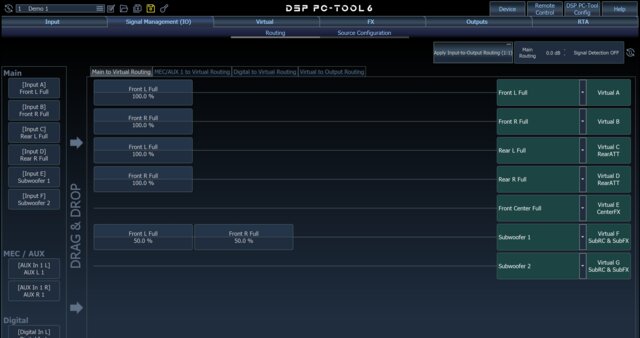 The two front inputs feed every channel. The sub takes 50% of each.
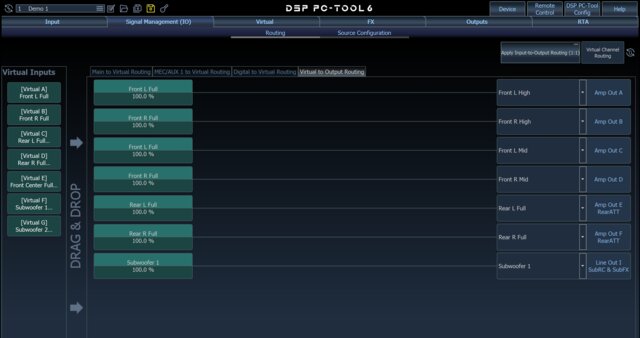 Each channel then goes to its own output.
Crossovers
The crossovers are the filters that decide which speaker plays which frequencies. These are my starting settings, with every filter at −24dB:
| Speaker | Plays |
|---|---|
| Tweeters | Above 2,500 Hz |
| Midbass | 90 – 2,500 Hz |
| Rears | Above 100 Hz, kept quieter than the fronts |
| Subs | 30 – 90 Hz |
Where two speakers hand over, both use the same frequency with Linkwitz filters, a filter type designed so the two speakers blend without a bump. The subs take everything below 90Hz because the slim midbass has little cone travel.
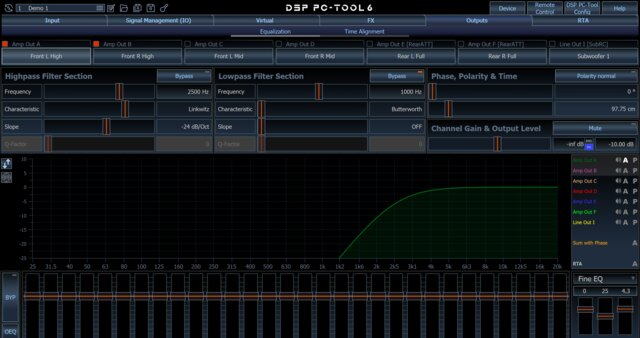 Tweeters: highpass at 2,500Hz, set 10dB quieter than the midbass.
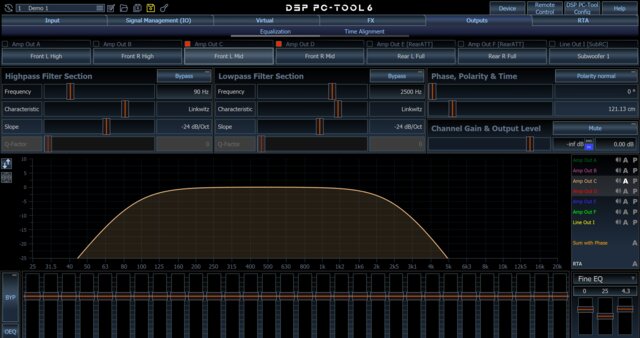 Midbass: highpass at 90Hz and lowpass at 2,500Hz make the “hill” shape, with the 30-band EQ
underneath.
Midbass: highpass at 90Hz and lowpass at 2,500Hz make the “hill” shape, with the 30-band EQ
underneath.
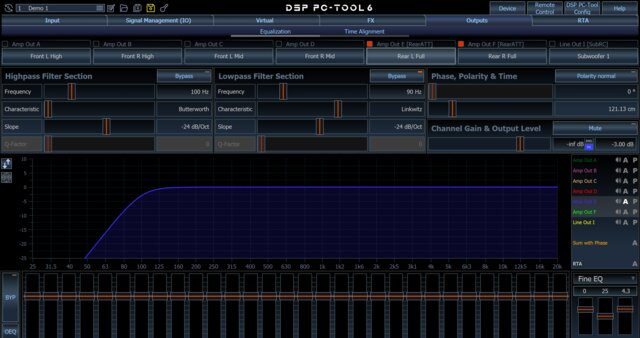 Rears: highpass at 100Hz, set 3dB quieter.
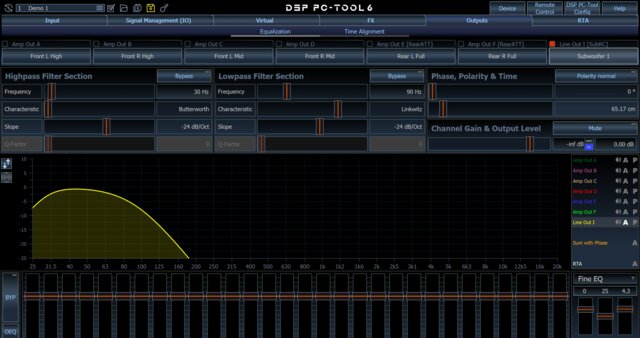 Sub: 30–90Hz.
Levels
Each output has its own level, so I balanced the speakers against each other by ear, in 1–2dB steps with left and right linked. I used the midbass as the reference, then brought the tweeters in quieter (they’re more efficient and sit right in front of you on the dash), kept the rears well below the fronts so the sound stays up front, and set the subs to taste.
Time alignment
Each speaker is a different distance from my head, so sound from the nearest ones arrives first. Time alignment delays the nearer speakers so everything arrives together, which pulls the sound to the middle of the dash. In PC-Tool’s Distance Mode I entered the distance from each speaker to my head in the driver’s seat, and it worked out the delays. The furthest speakers, the left midbass and left rear, get no delay. The sub, right under my seat, gets the most.
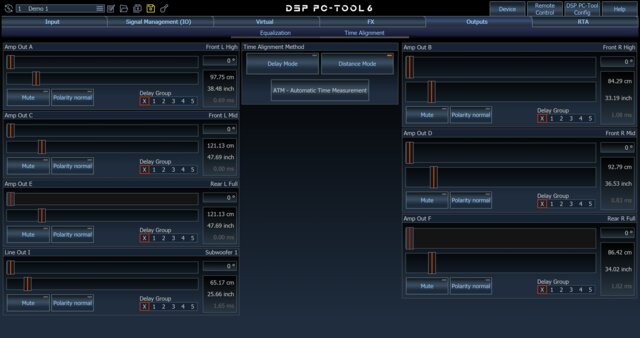 Time alignment in Distance Mode. The nearer the speaker, the longer the delay.
The remote
Day to day I use the URC.1 remote to control the sub volume. It has a single knob. It replaced the URC.3 I fitted first, plugs straight into the amp’s SCP port, and sits under the dash on the driver’s side, next to the centre stack, where it’s easy to reach.
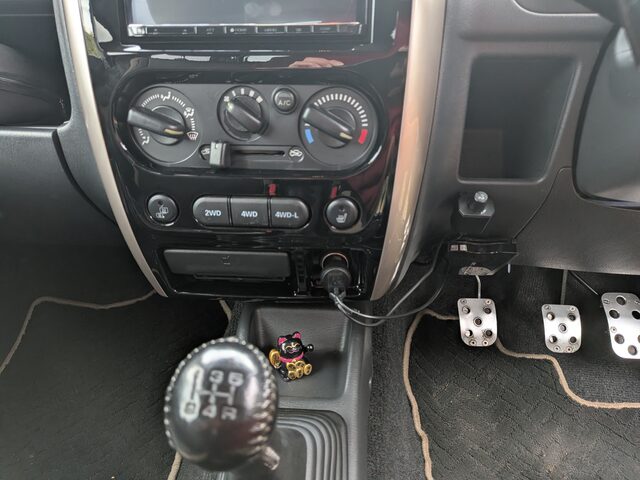 The URC.1 under the dash, just right of the centre stack.
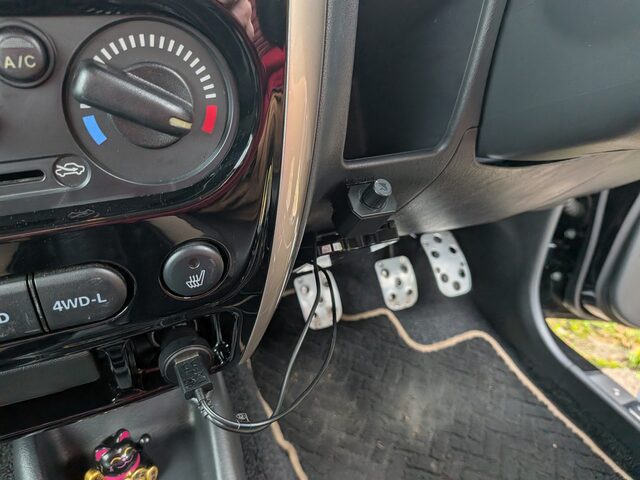 Close-up of the knob, below the cubby by the steering column.
The remote is set up in PC-Tool’s Remote Control screen, where I picked the URC.1 and gave it the subwoofer volume.
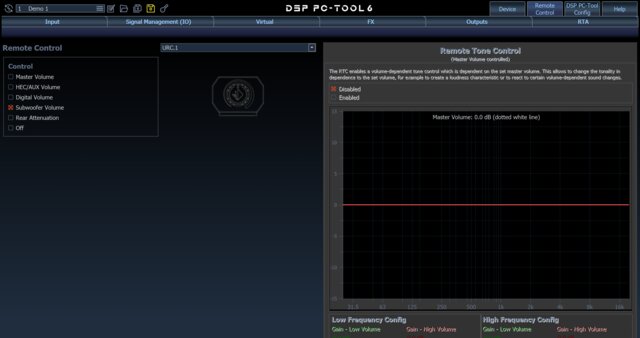 In PC-Tool, the URC.1 is set to control the subwoofer volume.
How it sounds
Really great. I get excited every time I take the car out. There’s lots of bass, enough to shake the rear-view mirror.
Here’s a demo I recorded on my phone. The phone mic doesn’t pick up the bass very well, so it sounds better in the car.
Now that I’ve tuned the system, with the input gain and sub gains set correctly and the tweeters turned right down at -11dB, and with the power wires and fuses all correct, I’m fairly confident there’s very low risk of me blowing anything. The amp also has a protection mode that shuts it down if there’s a short, it overheats or the voltage goes funny.
I can’t really play it past about 60% anyway, it’s just too loud. At high volume the rear-view mirror goes crazy, it shakes a lot. Certain bass frequencies, especially on house tracks, set off a rattle in one of the panels on the left side. But otherwise it’s a really clean sounding system, as long as you’re not doing 60mph 😉
The obvious fix for the road noise is sound deadening, but I’m on the fence about it. Once that sticky stuff goes on, it’s never really coming off again. It’s also a lot of work, taking off all the panels and door cards to fit it, and I’m not that experienced with this kind of thing. So I’m not sure it’s worth the effort. I do know a place in West Yorkshire that could do it for me, but I haven’t decided yet.
Looking back
It was more complicated than I expected, but it was a great learning experience, and the first time I’ve ever installed an amp. I did most of it in one weekend, and the rest spread out over many more. I had many frustrating moments, I had to contort my body into unnatural positions, and I dropped things into the bodywork that I’ll never get back (RIP speaker clip nuts). But I persevered, and I’m really proud of my work.
If I did it again, I’d put more thought into making it clean. I felt a bit rushed, just getting everything connected, when I could have had a better plan for running the wires so it all looks more stealth and OEM. I’d also use multi-core cable to connect the amp to the factory speaker loom instead of separate wires. There’d be far fewer runs to route and tidy.
What it cost
| Cost | |
|---|---|
| Match UP 6DSP MK2 amp | £549.99 |
| Morel Virtus Nano MW4 midbass | £529.00 |
| Audison Voce II AV 1.1 II tweeters | £349.99 |
| 2 × Harman Kardon Feel 700 subs | £509.98 |
| Focal ICU 100 rears | £109.00 |
| Wiring, fuses, remote and tools | ~£400 |
| Total | ~£2,450 |
Not counting the head unit.
So yeah, a lot of money. Was it worth it? I absolutely love it. My only complaint is the Jimny doesn’t do much to block road noise, so the sound suffers a bit when you’re going fast. Other than that, no regrets. I probably won’t spend any more on it though. Now it’s just about getting the tuning right, which is a lot of trial and error really.
Full build notes
The full plan, with wiring tables, a parts list with links and a step-by-step DSP setup guide, is on GitHub: badsyntax/jimny-sound.
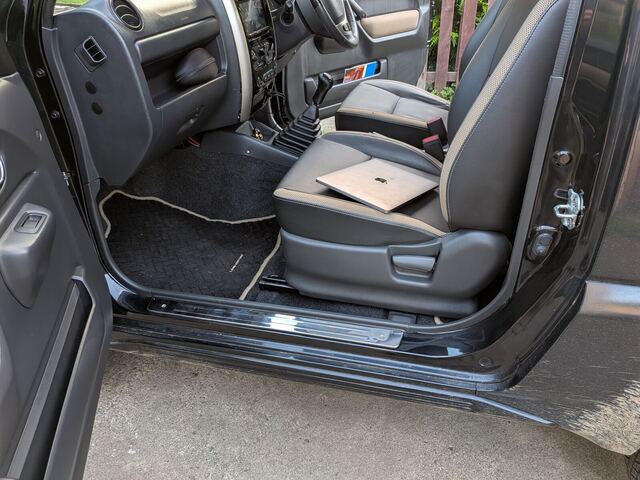 Finished. The amp is in the glovebox and the subs are under the seats.